Saturday 26 March 2011

Summer Term: Dates and Times

It’s over so soon, where does the time go, the Spring Term is done and dusted.  Students get two weeks break now, and we start the Summer term, two weeks before Easter, as that break is late this year because of the date that Easter happens to fall this year.

The dates and times are as follows:

Digital Photography:  Starts – Tuesday 12th April for two weeks. Then two weeks off returning on Tuesday 11th May, for 4 weeks, then it’s the Whitsun half-term break, and we return on Tuesday 25th May for the final 4 weeks, that make up the 10 weeks!

PC Maintenance:  Starts – Wednesday 13th April for two weeks. Then two weeks off returning on Wednesday 12th May, for 4 weeks, then it’s the Whitsun half-term break, and we return on Wednesday 26th May for the final 4 weeks, that make up the 10 weeks!

See you then….it should be good!

Fotolia_3383852_XS

Wednesday 23 March 2011

PC Maintenance Class 10: Term 2

Tonights session was based on the command line , or command prompt. Before Windows was on our computers, the MS-DOS environment was all we had. Our computers and the commands and fuctions it uses were what we class today as ‘command driven’.

MS-DOS (short for Micro Soft Disk Operating System) is an operating system for x86-based personal computers. It was the most commonly used member of the DOS family of operating systems, and was the main operating system for IBM PC compatible personal computers during the 1980s to the mid 1990s, until it was gradually superseded by operating systems offering a graphical user interface (GUI), in particular by various generations of the Microsoft Windows operating system.

MS-DOS grew from a 1981 request by IBM for an operating system for its IBM PC range of personal computers. Microsoft quickly bought the rights to QDOS (Quick and Dirty Operating System), also known as86-DOS, from Seattle Computer Products, and began work on modifying it to meet IBM's specification. The first edition, MS-DOS 1.0, was launched in 1982. The version shipped with IBM's PCs was called PC DOS. Although MS-DOS and PC-DOS were initially developed in parallel by Microsoft and IBM, the two products eventually went their separate ways.

During its life, several competing products were released for the x86 platform, and MS-DOS itself would go through eight versions, until development ceased in 2000. Ultimately it was the key product in Microsoft's growth from a programming languages  company to a diverse software development firm, providing the company with essential revenue and marketing resources. It was also the underlying basic operating system on which early versions of Windows ran as a GUI.


Here is a typical screen shot of a computer running MS-DOS.  Not much to look at really:

The above screen shot shows MS-DOS version 3.3 and it is a directory listing of a floppy disk in the computers drive A:

I introduced the class to the concept of using “wildcards” in MS-DOS, and how they can still be used today in the search functions and capabilities of Windows XP,  Vista and 7.

Wildcards are characters that can be used to stand-in for unknown
characters in file names. In card games, a wildcard is a card that can match
up with any other cards. In DOS, wildcard characters can match up with any character
that is allowable in a file name.

The asterisk character, *, can stand in for any number of characters.
Some examples of this command:

c:\>del *.doc

This command would delete every file with the doc extension
from the root directory of C: . So files like myfile.doc, testfile.doc, and
123.doc would all be deleted.

C:\>copy ab*.txt a:

This command would copy every file that began with ab,
and had an extension of txt, to the floppy drive A: . So files like abstract.txt,
abalone.txt, and abba.txt would all be copied.

C:\temp\>del *.*

This is the fastest way to clean out a directory. This command
will delete every file in the directory C:\temp\. The first apostrophe covers
every filename, and the second one covers every extension.

For some substantial information on using Wildcards in Windows search, click this link.

Tuesday 22 March 2011

Digital Camera Class 10: Term 2

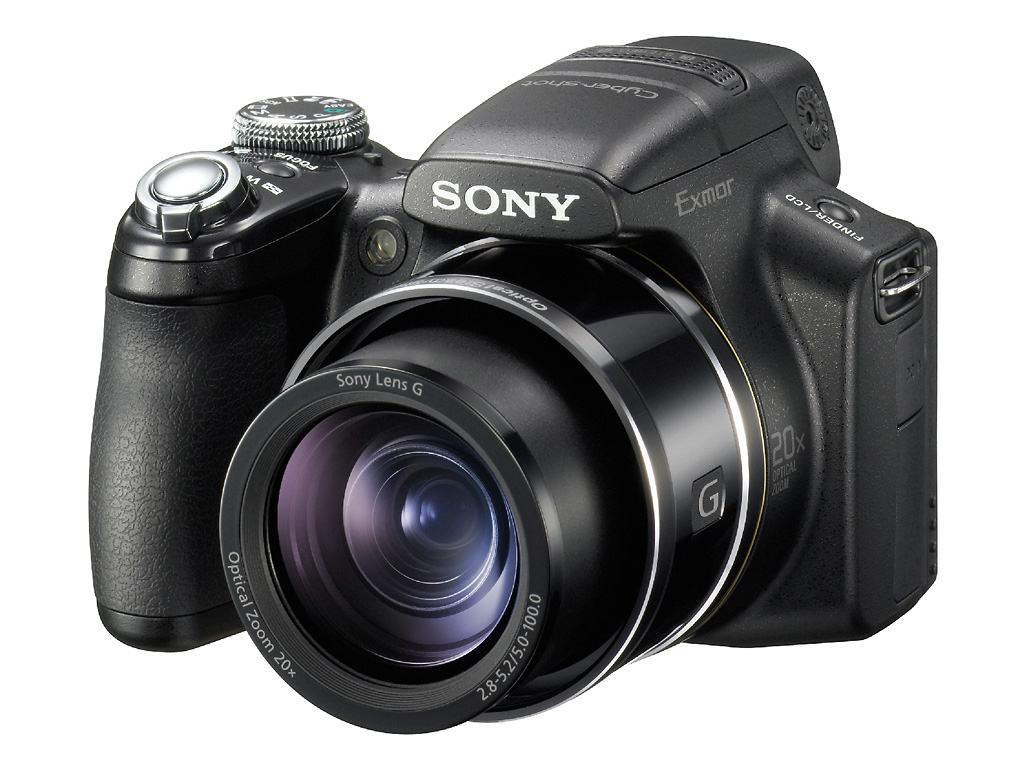
Can you believe it? The Spring term has come and gone….this is our last class!  Just a small group tonight, only Colin and Dick. We used to time to research and look into specialist things for them, such as 1.7 telephoto convertor for Dicks’ Sony DCS HX1 camera, and he had also brought in his adapter and convertor kit for us to see.

The converter kit will allow him to connect a variety of filters and the petal filter hood.

Here is a photograph of his camera, a later version of the previous camera I had myself.

A two week break now, we’ll be back soon for the summer term – see you then!

Wednesday 16 March 2011

PC Maintenance Class 9: Term 2

We spent a lot of time looking at harddisk, and discussing partitions, stripe setting, and disk mirroring last time. This week, using my faithful demo computer, we had a look at how Windows these days deals with disks.

This is done using the Computer Management tool ‘Disk Management’.

Disk Management is a snap-in that's part of the Microsoft Management Console supplied with Windows XP.  Just as the name Disk Management implies it's a tool used to manage system disks, both local and remote. If you've been around personal computers for a number of years you're familiar with Fdisk, the utility that was used in conjunction with the Format command to set up hard disks from the command prompt. Disk Management, with its graphical user interface, goes a long way to eliminating the need for the command prompt utilities and makes it easy to obtain a quick overview of the system and the relationships between installed disks.

There are a few different ways to access Disk Management. I'll list three different methods so choose whichever is more convenient.

  • Method 1  -  Start > Control Panel > Performance and Maintenance > Administrative Tools. Double click Computer Management and then click Disk Management in the left hand column.
  • Method 2 - By default, Administrative Tools is not shown on the Start Menu but if you have modified  the Start Menu (by right clicking the Start button and selecting Properties > Customize) so it is shown then just select Start > Administrative Tools >  Computer Management and then click Disk Management in the left hand column.
  • Method 3 - Click Start > Run and type diskmgmt.msc in the Open: line and click OK. The Disk Management snap-in will open.

Three Basic Areas of Disk Management

The basic Disk Management console is divided into three main areas and just about as straightforward as one can get. In the screen shot below the areas are defined by green, red, and blue rectangles. The Console Tree is the tall vertical column on the left that's defined by the green colour. If Method 3 above is used to open Disk Management it will open without the Console Tree being displayed. I suggest you get rid of the Console Tree as it really serves no purpose once Disk Management is open. Even if you used one of the other methods, the Console Tree can be eliminated by clicking the Show/Hide Console Tree icon (fourth from left) on the standard toolbar.

The red and blue areas are referred to as Top and Bottom and are both user definable via the View menu option. By default, the Top area displays the Volume List and the Bottom area displays the Graphical View. A third view called Disk List can be substituted in either pane if it's more to your liking, or the Bottom pane can be hidden completely. The View menu option also contains a [Settings...] option that allows adjustment of the colour schemes, size of the drive displays and a few other options so the console can be tailored to individual taste.

Tuesday 15 March 2011

Digital Camera Class 9: Term 2

Adobe Photoshop is a graphics editing program developed and published by Adobe Systems Incorporated.

Adobe's 2003 "Creative Suite" rebranding led to Adobe Photoshop 8's renaming to Adobe Photoshop CS. Thus, Adobe Photoshop CS5 is the 12th major release of Adobe Photoshop. The CS rebranding also resulted in Adobe offering numerous software packages containing multiple Adobe programs for a reduced price. Adobe Photoshop is released in two editions: Adobe Photoshop, and Adobe Photoshop Extended, with the Extended having extra features available. Adobe Photoshop Extended is included in all of Adobe's Creative Suite offerings except Design Standard, which includes the Adobe Photoshop edition.

Tonight the group looked at whether or not it was indeed better than Corel’s Paint Shop Pro. The results in, the group said no…Paint Shop Pro was a much easier to use program, and did exactly the same in a fraction of the time.

image20080212psamla_2

Wednesday 9 March 2011

PC Maintenance Class 8: Term 2

Harddisks, Partitioning, Volumes and Stripe Sets this was tonight’s agenda. Last week we saw how a machine was restored from what was a haddisk partion, but how does a harddisk work, and precisely what is partioning and other things we can do with harddisks.

Below is a diagram of the inside of a harddisk. It isnt recommended you remove the cover from your working harddisks, they are vaccuum sealed, however to get an understanding of the mechanics of one, it might be interesting for you to take apart one from an old computer.

I actually powered up the dismantled drive so that the class could see how it worked. I often refered to how it worked, by drawing parallels to those of a record player, with a stylus and a 12” vinyl record.

We then talked about Disk Formatting and Partitioning. What is Formatting?

Formatting a hard drive is generally done when a new hard drive has been purchased and installed in a new computer. Formatting a hard drive enables it to be able to read and write data by creating a partition on the drive. A hard disk drive can be formatted or reformatted depending on what is being done to the drive

When a new hard drive is formatted a bootable partition is created. The partition that is created is where that operating system is installed. Once a drive has been formatted it can then be used as a Master disk or a Slave disk. A second partition can also be created on the hard drive that can be used as a virtual hard drive.

Formatting a hard drive requires selecting a file system that will be used on the drive. The file system is what the operating system uses to organize and locate information that is written to various sectors on the hard disk. A hard drive with an older files system may not work on a computer designed for a newer file system.

Formatting a hard disk drive will overwrite the data on the drive. However, the data hasn't exactly been erased. The formatting process only removes the operating system's ability to read the data on the drive. Data needs to be rewritten to the drive and then reformatted again to ensure that data is no longer accessible.

Formatting a hard disk drive can fix bad sectors or areas on the disk. When a disk that has errors is reformatted the bad areas of the disk are skipped and not used. This can extend the life of a hard disk drive that can be going bad by isolating the bad areas of the drive.

Useful resources:-

Formatting Disks - Frequently Asked Questions

How to Create and Format a Hard Disk Partition

How to Delete a Hard Disk Partition

Can I repartition my Hard Disk?

We ended the session by discussing what Disk Mirroring,  Striping or Extending Volumes and what RAID arrays were.  Disk Mirroring is where  you have two hard disks fitted into a computer, and when you save data, it is written to both disks. By continuously writing to two sets of disks, you ensure immediate access to duplicate data with virtually no data loss. If one hard drive fails, then the data can be retrieved from the second hard drive.

Disk Striping, in its simplest form is a collection of disks that together, through striping, makes up one unit. So you could have three hard disks in a computer, the first being partitioned as C: and D:, but the D: drive can be extended onto the second and third disks. If each disk were 1 terabyte, you end up with a computer system that has a 500GB C: drive, and a 2.5 TB D: drive.

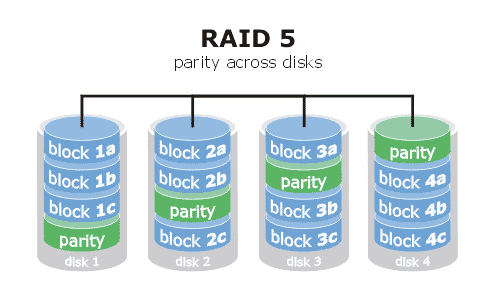
RAID, an acronym for Redundant Array of Inexpensive Disks or Redundant Array of Independent Disks, is a technology that allows high levels of storage reliability from low-cost and less reliable PC-class disk-drive components, via the technique of arranging the devices into arrays for redundancy. In simpler terms, a RAID array is a grouping of hard drives. A NAS drive for example might have 4 disks in it, but configured in what is known as RAID5 format. The data is written to two drives at a time, allowing at any point one hard disk to physically fail, and the unit to carry on functioning. RAID5 is the most popular, but there are many different configurations.

RAID Level 5 is a cluster-level implementation of data striping with DISTRIBUTED parity for enhanced performance. Clusters can vary in size and are user-definable but they are typically blocks of 64 thousand bytes. The clusters and parity are evenly distributed across multiple hard drives and this provides better performance than using a single drive for parity. Out of an array with “N” number of drives, the total capacity is equal to the sum of “N-1? hard drives. For example, an array with 4 equal sized hard drives will have the combined capacity of 3 hard drives. This is the most common implementation of data striping with parity. In this example 25% of the storage purchased is used for duplication.
RAID is a good bedtime reading matter, and for further reading at this level here is a good starting point!

Tuesday 8 March 2011

Digital Camera Class 8: Term 2

Tonight’s class was a presentation all about the use of graphics tablets and the wonderful piece of software that is Corel Painter.

What is a graphics tablet? A graphics tablet (or digitising tablet, graphics pad, drawing tablet) is a computer input device that allows one to hand-draw images and graphics, similar to the way one draws images with a pencil and paper. The one that I have is made by the company Wacom, a company who has the reputation of being the best company for graphics tablets. The particular model I have is the Wacom Bamboo, as shown below:

Inspired by natural human abilities to create, their patented pen and touch input technology allows freedom of expression, inspired creativity, and drastic improvements in productivity, control and comfort. From product development and graphic design to the media and entertainment sectors, Wacom facilitates the work of individuals and workgroups with truly natural ways to work with digital content.

Wacom believe that technology should be easy to use and simple to understand. With products that rely on human intuition and natural movement, they claim to strive to bring people and technology closer together. Their pen and touch input technology has helped professionals around the world create extraordinary characters, digital art, films, special effects, fashions, and industrial designs. They say that some of the most celebrated companies in these industries rely on their products.  They also claim “No other technology company strives to design tools that empower creative professionals the way Wacom does. Not even close.”

After having a good look at what the graphics tablet is, we looked at Corel Painter.

Corel Painter is the world's most powerful Natural-Media software.  “ By adding Painter to your workflow, you gain a full art studio that gives you the tools to create unprecedented artwork.Digital art tools let you experiment with color theory, composition and brush strokes, without the toxins, mess and expenses associated with traditional art. Support for the entire Wacom® product line, including industry-leading Cintiq® interactive pen displays and Intuos® drawing tablets, gives you the most responsive digital painting experience so your hand and brush work fluidly as one. Customizable paper textures give your art added artistic undertones, plus a level of texture and detail that no other digital painting or photo-painting tools can produce. Painter is changing what's possible in art. Now it's your turn.”

Click here for details on the very latest version of Painter, with is Version XI

In its earlier forms, Painter would be sold in an actual paint can – quite a novelty, these days, now that ownership of the product is with the Canadian company Corel, they tend to do a certain amount of limited editions in cans, as a kind of nod to the past. Below is the limited edition can for version 10.

image

You can create your own pictures from scratch or turn your own photographs into works of art using clever cloning brushes. Here are some examples of pictures I have created myself.


Clone of blue-sky-wallpaper

Beach at Sunset

Morning Winter Sun

Check out more examples in my own “Corel Painter” gallery by clicking this link

Wednesday 2 March 2011

PC Maintenance Class 7: Term 2

When it comes to the point where you want to wipe a computer back to factory defaults, many machines these days come with a hidden partition on the harddisk that with a certain key combination will allow you to restore your computer.

What is a partition though?  Hard disk partition refers to the creation of logical divisions upon a hard disk that allows one to apply operating system-specific logical formatting.  Or in simpler terms, disk partitioning is the act or practice of dividing the storage space of a hard disk drive into separate data areas known as partitions. A partition editor program can be used to create, delete or modify these partitions. In Windows 7 we use the Disk Management tool, in the Computer Management console.

For example an 80GB harddisk, could be partitioned in half, the first half being drive C: and the second half being drive D:

For the sake of argument it is like the computer has two seperate drives.

Why might we do this?  One reason might be to seperate the System data (Windows) from the Users data (contents of My Documents).  These days though it is far cheaper to buy a second disk, and besides if something happened to the harddisk of which has multiple partitions, you’d loose all the data.

However, manufacturers sometimes set aside a minimal amount of diskspace in a partition to restore the computer back to its factory state. The size of such partitions can vary, be are usually somewhere in the region of 5-20gb, which isnt a tremendous amount of space to loose off something like a modern day 250 or 500GB drive.

The example we used in class, was my faithfull RM F-Series computer. In the case of the RM F-Series, when it boots, you see displayed in the upper left hand corner of the screen, the characters RMR….at this point you are given a few moments to access the partition for restore purposes.  To access the partitions, you need to press both Shift keys at that point. If you are too slow, you will have to reboot and try again.

The restore menu allows you to double check the intregity of the backup image, and typically takes about 10 minutes to restore, back to a state as it was when you first unpacked your new computer!

correct

Tuesday 1 March 2011