Saturday, 30 October 2010

C-3P0 and R2-D2 Visit Currys!

Star Wars stars R2D2 and C3PO have landed on Earth, this time to investigate the wonders of PC Word and Currys!


The advert sees C-3PO and R2-D2 land on planet earth in a Megastore car park late at night, with R2-D2 boldly breaking into the store, closely followed by C-3PO.  The droids proceed to explore the store, amazed at the brilliant technology on offer, and interacting with items as varied as cameras and fridge freezers in the iconic and inimitable style that their fans have come to know and love.  With references to many Star Wars favourites -- including of course, the droids’ arch enemy Darth Vader -- the advert is set to delight young and old Star Wars fans alike.

Tuesday, 26 October 2010

Back to the Future – 25 years old!!

Great Scott!  Has it been that long? It only seemed like yesterday that I was taken to the cinema with some of my friends and neighbours to see this film! I remember at the time, not knowing much about the film, it didn’t seem to appeal to me really, but little did I know that having watched it, it blew me away! Fantastic story, great characters…followed by two sequels in later years, and its now one of the most popular films in recent cinematic history! A classic!

For those have been living in a cave for the last three decades, Back to the Future is a 1985 American science-fiction comedy film directed by Robert Zemeckis, written by Zemeckis and Bob Gale, produced by Steven Spielberg, and starringMichael J. Fox, Christopher Lloyd, Lea Thompson, and Crispin Glover. The film tells the story ofMarty McFly, a teenager who is accidentally sent back in time from 1985 to 1955. He meets his parents in high school, accidentally attracting his mother's romantic interest. Marty must repair the damage to history by causing his parents to fall in love, while finding a way to return to 1985.

If you’ve not seen it, go and see it in a cinema near you!

Saturday, 23 October 2010

Half-Term: School’s Closed Next Week!

image From Monday 25th October 2010, the school will be closed for the Autumn Half-Term Holiday break. Classes will resume the week beginning 1st November 2010.

H a p p y   H a l l o w e e n !

Wednesday, 20 October 2010

PC Maintenance Class 4: Term 1

At some point when doing PC Maintenance, you are going to have to do an Operating System installation, or Windows Installation in this instance. Why might we have to do this? Well we would have to do this if the harddisk in a computer were to fail, or if you wanted to replace your exisiting drive with a larger capacity one.

You maybe lucky enough to have with your brand new computer, a Recovery DVD or CD, that you simply put into the computer, follow the onscreen instructions and your computer can be reinstalled in about 3o mins.

However if you dont have one of these, you will need to use your Windows Installation disk that came with your computer.

To help you and make things easy, Microsoft provide some useful tutorials for you to print out to assist you:

The above link caters for Windows7, Windows Vista and Windows XP.

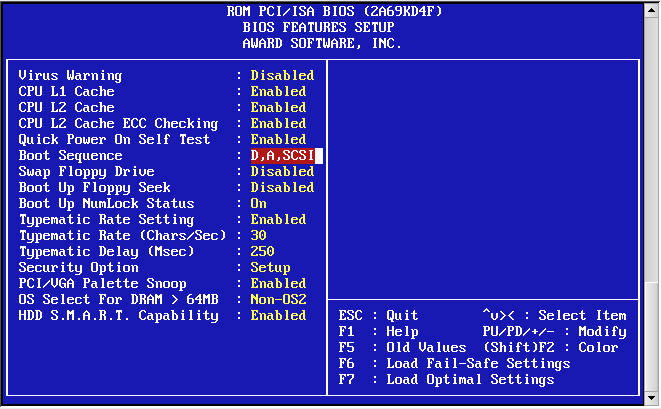
One of the things you will need to do is change the boot sequence of your computer, to make it boot from the Windows CD.  Most computers will tell you upon boot what key is necessary to press to enter what is known as BIOS setup. My own PC gets me to press DEL, others say F2

When you are in

Example of a typical BIOS screen.

Other BIOS screens have the same options, but presented in a different manner. If in doubt consult the booklet that accompanies your motherboard. Or download the information from the circuit board manufacturers website.

Its basically all about following the instructions on the screen. You will be asked several questions along the way, mainly things to do with regional settings, such as where in the world you are, so that keyboard settings, currency settings and language settings are correct. Towards the end of the installation you will be asked some questions such as who will be using the computer, where you’'ll be required to type in the name of the people who will have access. For a typical home computer it might be Mum, Dad, Child1 and Child2 perhaps!

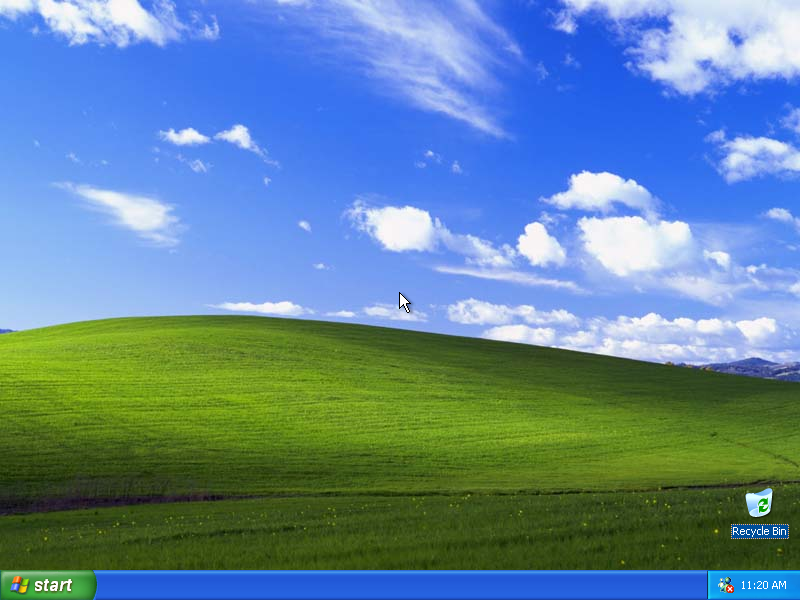
Put your feet up and read the Microsoft propaganda, about how your life will be changed!  Then before you know it, you’ll be seeing the green fields and the blue skies….I dont mean you will have fallen asleep into dreamland, but rather the Windows desktop.

If you are using Windows Vista or Windows 7, it is well worth using the built in Backup and Recovery Centre to create a System Repair CD, a System Image, and Backup. These can save you so much time – I’ve used them myself and they work well!!

Next time, some simple home networking techniques- same time, same channel, same classroom!  Be there!

Tuesday, 19 October 2010

Digital Camera Masterclass Class 4: Term 1

This week we tried to hammer out the mystery of layers in Paint Shop Pro and what exactly will they do for us!

First of all, here are some resources on layers for you:

Try this example yourself. It involves replacing the sky on one of two images. Download the instructions, and the two photographs below. You’ll be surprised at the results.

Additional information on Layers: 

When you create or import an image in Corel Paint Shop Pro Photo, the image has a single layer. Depending on the type of image you create or import, the single layer is labelled as Background, Raster, Vector, or Art Media. When you open a photo, scan, or screen capture, the single layer is labelled as Background on the Layers palette.

For most simple corrections and retouching, you do not have to add layers to an image. However, it is a good practice to duplicate the single layer  before making image corrections, so that you preserve the original image on its own layer. If you intend to do more complex work — such as adding elements to the image, creating photo compositions, adding text, or applying other effects — the use of layers is highly recommended. image

Layers are like separate sheets that you combine to create a final composition.

Each layer you add begins as a transparent sheet over the background. As you add brushstrokes, vector objects, or text, you cover up parts of the Background layer. Transparent areas let you see the underlying layers. You can stack multiple layers to create artistic compositions, photo collages, or complex illustrations.

Background Layers.

The background layer  is the bottom layer of an image. When you import JPEG, GIF, or PNG images into Corel Paint Shop Pro Photo, they have only this single layer, which is named “Background” on the Layers palette.

The background layer contains raster data, but it cannot display transparency. You cannot change its blend mode, opacity, or order in the stack until you promote it to a raster layer.

To position a background layer higher in the layer stack, you can promote it to a regular raster layer.

If you create a new image with a transparent background, it does not have a background layer, and its bottom layer is a raster layer named “Raster Layer 1.” You can move this layer anywhere within the stacking order. You can also change its opacity and blend mode.

Corel Paint Shop Pro Photo supports transparency on layers other than the background. To create an image without transparent areas, you can choose a solid-coloured background. The image contains a background layer as the bottom layer.

To create a new image with transparent areas, choose a transparent background. The image contains a raster layer as the bottom layer.

Raster Layers.

Raster layers  are layers with raster data only. Raster data is composed of individual elements, called pixels, arranged in a grid. Each pixel has a specific location and colour. Photographic images are composed of raster data. If you magnify raster data, you can see the individual pixels as squares of colours.

Raster layers let you display subtle changes in tones and colours. Some tools, options, and commands apply only to raster layers. For example, the painting tools and the commands that are used to add effects can be applied only on raster layers. If you try to use a raster tool while a vector layer is selected, Corel Paint Shop Pro Photo prompts you to convert the vector layer into a raster layer.

Only grayscale and 16 million–colour images can have multiple raster layers. When you add a new adjustment layer or raster layer to an image of another colour depth, Corel Paint Shop Pro Photo prompts you to convert it to 16 million colours.

Vector layers

Vector layers  are layers with only vector objects (lines and shapes), vector text, or vector groups. Vector objects and text are composed of geometric characteristics — lines, curves, and their locations. When you edit vector objects and text, you edit these lines and curves, rather than the individual pixels. Vector graphics and vector text maintain their clarity and detail at any size or print resolution.

Objects or text created with vector layers can be easily edited. Images of any colour depth can include multiple vector layers. Each vector layer contains a list of all individual vector objects on that layer. You can expand or collapse the group to view the individual objects.

Vector objects can be moved from their layer group to another vector group.

You cannot move a vector object to a nonvector layer; vector objects must be placed on vector layers. If you create a vector object while a raster layer is selected, Corel Paint Shop Pro Photo creates a vector layer just above the selected layer.

Ahhhh such wonderful bedtime reading!! ;)

Monday, 18 October 2010

Microsoft Publisher Class 4: Term 1

An Advent calendar is a special calendar which is used to count or celebrate the days of Advent in anticipation of Christmas. Some calendars are strictly religious, whereas others are secular in content.

Today, most advent calendars are made for children. Many take the form of a large rectangular card with many "windows", one of which is opened every day during Advent. In less elaborate calendars, each window opens to reveal an image, a poem, or part of a story such as the Nativity story itself.

Our project tonight was to create a simple Advent Calendar using Microsoft Publisher. Basically this project involves two A4 sheets of paper. First of all the student draws out, then cuts and pastes 24 rectangles or square on Page 1 of the document. These will become the doors to the front of the calendar. Now to ensure that the pictures inside the doors line up with the doors themselves, once all twenty four doors are laid out, they all can be copied and pasted onto Page 2.  Once done, returning to the first page, a suitable background photograph or image can be pasted behind the doors, something like a nice Christmas or Winter Scene.

Once done, using the text tool the numbers can be typed onto each of the doors. A calendar without numbered doors kind of defeats the purpose. Then the final thing to do is paste either your own photographs onto Page 2, or clipart if you prefer, using the doors as a reference point.

Print out both pages, on a colour printer. Then, using a scalpel or craft knife cut out three sides to each door on the front page. If you do all four, the doors will fall out – bad idea!  Then carefully glue the two pages together, pasting the glue in between the doors and around the edges. If you get glue on the doors, they will not open – bad idea number 2!  Here are some pictures of Rachel’s calendar from class.

image

Completing the project in Publisher. Rachel has chosen bright red numbering for the doors. Ideal for younger children!

image

Cutting out the doors, and getting ready to paste together!

We only had access to a black and white laser printer in the IT suite we were in, but I’m sure the results would be much better with a colour printer, even better, an A3 printer!  Of course if you want to really add a Christmas sparkle to your calendar, you could add some glue to the front of it, and put glitter on it, and maybe some ribbon or tinsel! 

There’s a few weeks to go before December so have a go for yourself! It’s easier than you think!

Wednesday, 13 October 2010

PC Maintenance Class 3: Term 1

Continuing on from where we left off last week, we looked at the Windows 7 Control Panel. The image below is what is known as ‘Catogory View’.

Personally I am more of a fan of the ‘Classic View’ which is more akin to Windows 95.  Everything is laid out in a simpler easy to find way, as can be seen below:

We spent the remainder of the lesson, going through all of the options that we have in here.  We spent a lot of time looking at the Backup and Restore Centre. Since data can be lost or corrupt by various means viruses, power failures, inexperienced users, etc. it is very important, for even home users, to back up their files. By performing a simple backup, a home user can easily restore their files should they become corrupt or mysteriously disappear.

Windows 7 makes it easy for you to create a backup of your files through the Windows Backup program that lets you make copies of your files or create a system image. Although it is not an elaborate program, it has all the necessary features for home users to back up their important files.

How to Backup in Windows 7.

1. Click Start and click Control Panel.

2. Click System and Security.

3. Click Backup and Restore Centre.

4. Click the Set up backup button.

5. Select where you want to save your backup and click Next.

6. Windows prompts you to select what you want to back up. You can let Windows choose or you select the files to include in the backup. Most people likely want to choose their own files so click the Let me choose option. Click Next.
7. Select the drives and folders you want to backup. Click Next.

8. Click the Save settings and run backup button. Given that home users often overlook their backup plan, you should schedule Windows Backup to run automatically, say on a weekly or monthly basis depending on how critical your files are. You can change the default backup schedule by selecting the Change Schedule option in step 7.

How to Restore in Windows 7

1. Click Start and click Control Panel.

2. Click System and Security.

3. Click Backup and Restore Centre.

4. Click the Set up backup button.

5. Select where you want to save your backup and click Next.

6. Windows prompts you to select what you want to back up. You can let Windows choose or you select the files to include in the backup. Most people likely want to choose their own files so click the Let me choose option. Click Next.
7. Select the drives and folders you want to backup. Click Next.

8. Click the Save settings and run backup button. Given that home users often overlook their backup plan, you should schedule Windows Backup to run automatically, say on a weekly or monthly basis depending on how critical your files are. You can change the default backup schedule by selecting the Change Schedule option in step 7.

Your choice of backup medium depends on the volume of data you have. Pictured above DVDs, External USB Hard disk and a desktop NAS drive.

image


Next week, simple home networking!

Tuesday, 12 October 2010

Digital Camera Masterclass Class 3: Term 1

Tonight, those that did their homework brought in a series of images based on the subject ‘Autumn’…the main criticism I received was that the season hasn't quite got autumnal enough for proper ‘autumn’ pictures. I’ve heard many excuses before, but I gave in to the group in the end! For the first set of photographs handed in, the results were very pleasing. Its nice to have a session occasionally like this, not just to present and show others the photographs that we have taken but to allow the group constructively the time to criticise and say what they like and dislike about certain elements in the photographs. For example, how might we improve the shot, maybe from a different angle….something like that! All in the name of constantly improving the photographs.

Afterwards, I amended last weeks project slightly with the addition of one more photograph.  I originally wanted to have a list of 12 shots, so that when printed on an A4 sheet, we would have 3x4…but I only gave 11!  So I added a picture into the sequence that will become the first photograph, and it will be entitled ‘Identity’.  Again, how you interpret this is up to you. An example could be, if you were an artist, the arrangement of your name, spelt with brushes perhaps, something like that.

We then had a look on the internet at two websites. The first was the Kodak website. Where in particular they had a very good page on improving your photography. It was Kodak’s Top Ten Tips – revisit it by clicking the link.  (Pictured Below)

image

After that, we had a look at a new website that I have recently come across, and that is Digital Photography School.com where there are a tremendous amount of resources on this website. I may refer back to this at a later date, but specifically for this evening I wanted to draw the classes attention to the Composition Tips which has several pages of good advice for the budding photographer. Classics include The Rule of Thirds and Framing Your Shots. Have a look at these at your leisure, there are some fantastic examples of great techniques here that you can apply to your own photographs!

Monday, 11 October 2010

Microsoft Publisher Class 3: Term 1

Tonight’s exercise was to create the front page of a made up newsletter. The brief was simple. The front page had to contain the following information:

  • A Newspaper Title / Name
  • A Price
  • Two News Articles with Headlines (One should be the main story)
  • Google could provide ‘sample’ content, rather than typing stories.
  • Two Adverts
  • A Variety of Suitable Fonts

We spent a considerable amount of time on this, utilising text boxes and clipart, and the following is an example of how well some of the students did. For a first attempt the results where very good.

image


The nice thing about Microsoft Publisher is that you can be as creative as you like. Halloween is fast approaching for those that participate in the annual celebration, and simple household decorations can be generated by using simple clipart, printed out on A4 sheets and tagged to string or ribbon. Its the ideal way to make you own bunting to hang and drape around the house. Some spooky ghosts and ghouls are some scary pumpkins!  Depending on the celebration it can be very easy!  Another good idea that I read about was that of carving cool look pumpkins! With Publisher? Yes, you print out the design and away you go…..check it out  by clicking the following link: Halloween Pumpkin Carving! 


Next week, a little ahead of ourselves, but getting ready for the festive season, we will have a look at how we can create a simple yet effective ‘Advent Calendar’.

Wednesday, 6 October 2010

PC Maintenance Class 2: Term 1

After having given the class a lesson in hardware last week, and having dismantled my demo computer, and re-assembling it, this week we started with our first good look at Windows.

I’m a firm believer that if you are going to learn to take care of your computer, you need to know and understand how it works from an Operating System point of view.  Just how does Windows work?

image

The demonstration started with an overview of the Control Panel. 

The Control Panel is a part of the Microsoft Windows graphical user interface which allows users to view and manipulate basic system settings and controls via applets, such as adding hardware, adding and removing software, controlling user accounts, and changing accessibility options. Additional applets can be provided by third party software.

The Control Panel has been an inherent part of the Microsoft Windows operating system since its first release (Windows 1.0), with many of the current applets being added in later versions. Beginning with Windows 95, the Control Panel is implemented as a special folder, i.e. the folder does not physically exist, but only contains shortcuts to various applets such as Add or Remove Programs and Internet Options. Physically, these applets are stored as .cpl files. For example, the Add or Remove Programs applet is stored under the name appwiz.cpl in the SYSTEM32 folder.

In recent versions of Windows, the Control Panel has two views, Classic View and Category View, and it is possible to switch between these through an option that appears on the left side of the window.

Many of the individual Control Panel applets can be accessed in other ways. For instance, Display Properties can be accessed by right-clicking on an empty area of the desktop and choosing Properties.

The classic view consists of shortcuts to the various control panel applets, usually without any description (other than the name). The categories are seen if the user use "Details" view.

The category view consists of categories, which when clicked on display the control panel applets related to the category. In Windows Vista, the category displays links to the most commonly used applets below the name of the category.

We’d got as far as delving into the depths of Virtual Memory and Device Manager and time caught up with us rather fast so we’ll finish off next week , and also have a look at the Windows 7 Control Panel to do a comparison.

For those interested in further information about Virtual Memory then you can simply following this link : Preventing Low Memory Problems

Tuesday, 5 October 2010

Digital Camera Masterclass Class 2: Term 1

Last week I asked the group to bring in some Autumn related bits of pieces. Leaves from trees, conkers, acorns etc – because tonight we were going to have a practical hands on session.

Putting the autumnal bits and pieces into various arrangements the group spent a considerable amount of the class taking various photographs. Here are a few images from what went on:-

imageClose up macro shots come out really nice. The small detail such as the veins in the leaves, particularly the Oak leaves that were brought in for this arrangement.

image Here we find Huw helping Mandy out with an Autumnal display. The use of the black background masks out any unwanted background clutter.

Something we discussed last week as a matter of importance was the necessity of having a strong bag to carry your photographic equipment in, and a brand I recommend is Lowepro – click the link and explore their range.

After the coffee break, I gave the group two lots of homework. The first was a simple exercise to take as series of photographs on the seasonal theme of Autumn. The reason behind this was so that we can all have a look at each others photographs next week, and have a constructive criticism session. This will allow me to see what the individuals photo skills are like, and then afterwards we will have a session on ‘composition’ to help improve the framing of the students photographs. I’ll also be demonstrating Kodak’s Top Ten Tips for Great Photography.

The second of the two homework projects had a longer ‘hand in date’ of Novemeber 2nd. This exercise, which the students will have plenty of time to do, is based on what is known as the photo marathon.  A photo marathon is a photography competition in which participants must take a series of photographs on predetermined subjects in a set period of time, typically 12 to 24 hours. However, this project is a bit more generous in the time permitted. I gave a list of 12 topics in which the students have to take one image per related word. The words were: Identity, Fresh, Reflection, Icon, Tasty, Old and the New, On the Move, Stop, Upside Down, One of a Kind, Noise and The End.

The class tonight ended with me giving  brief demonstration of how Paint Shop Pro works. I showed the group how easy it is to remove things from photographs with the Clone Brush and the Scratch Removal tool – all of which we will revisit the week after next!

Monday, 4 October 2010

Microsoft Publisher Class 2: Term 1

This week, I thought we would do something relatively simple, to ease the students into getting familiar with Microsoft Publisher. Birthday Cards!

There are wizards that talk you step-by-step how to create a variety of celebratory cards, but I wanted the cards done in a specific way.  A simple A4 page, folded in half, with a photo or image at the bottom, and a ‘Made by…’ tag, upside down at the top, so that when folded, you had the writing on the reverse side of the card.

image

The second part of the exercise was to print a verse or some text in the inside of the card. This involved patience, and knowing how the printer pulled paper through, and how to reposition the printed page in the paper tray to print on the inside in the correct position.

These days it always so easy to go out and buy a birthday card, and there are even places on the internet such as Moonpig.com that you can go to, to have them made for you…but really there is nothing quite like a personalised card that you know that someone has put some time and effort into creating for you.

For some introductory notes, there are some interesting resources on the two following websites. The first is Learnthat.com's Introduction to Microsoft Publisher 2003 and Inpics.net's Publisher in Pictures tutorial – have a look and see what you think!

The results around the class were very good, and good fun was had by all.