Tuesday 6 December 2011

Digital Photography Class 10

Ho ho ho!!! Well, it's our last class of the term, and year! It's very difficult at this time of year going somewhere during the time of our class, as its cold and dark, but Cardiff's Winter Wonderland proved the perfect venue.


We met up on the steps of the museum, and took a series of photographs of the sight's and sounds of Cardiff city's Christmas Festivities. The rain wasn't too bad, not enough to spoil it for us, and besides it gave a nice reflection to some of the street shots where to colourful lights were mirrored on the wet roads!


Here is a selection of the images I took. (Click each one for a larger view)


All that remains, is for me to thank everyone for coming along this term to class, and that I look forward to seeing those of you who are coming back in January. 


Happy Christmas and a Peaceful New Year.

Tuesday 29 November 2011

Digital Photography Class 9

The last of our classroom based class of this term, and indeed the year. Tonight we were looking at resizing images, and the reasons why we might do this.


The size of images we take with our digital cameras are measured in pixels.  So what are pixels? In digital imaging, a pixel, or pel, (picture element) is a single point in a raster image, or the smallest addressable screen element in a display device; it is the smallest unit of picture that can be represented or controlled.


Each pixel has its own address. The address of a pixel corresponds to its coordinates. Pixels are normally arranged in a two-dimensional grid, and are often represented using dots or squares. Each pixel is a sample of an original image; more samples typically provide more accurate representations of the original. The intensity of each pixel is variable. In color image systems, a color is typically represented by three or four component intensities such as red, green, and blue, or cyan, magenta, yellow, and black.


This example shows an image with a portion greatly enlarged, in which the individual pixels are rendered as little squares and can easily be seen.


In some contexts (such as descriptions of camera sensors), the term pixel is used to refer to a single scalar element of a multi-component representation (more precisely called a photosite in the camera sensor context, although the neologism sensel is sometimes used to describe the elements of a digital camera's sensor), while in others the term may refer to the entire set of such component intensities for a spatial position. In color systems that use chroma subsampling, the multi-component concept of a pixel can become difficult to apply, since the intensity measures for the different color components correspond to different spatial areas in a such a representation.


The word pixel is based on a contraction of pix ("pictures") and el (for "element"); similar formations with el  for "element" include the words voxel and texel.


Most pictures that come out of our cameras these days are quite big, and some are about 5mb in size, some may even be bigger. The main reason to resize some of our pictures is for the purpose of emailing them. Quite a lot of us have relatively fast broadband Internet connections, but it is something we shouldnt take for granted, as other may not have. What might take our computers a couple of seconds, might take a computer on a slower Internet connection several minutes to download. So we should really consider shrinking the size of photographs the next time we are going to send a dozen or so images to a friend attached to an email.


For step by step instructions on how to do this in all versions of PaintShop Pro, refer to the notes I gave in previous classes, they can be downloaded by clicking this link.


Next week for our final class, we will be wrapping up warm, and going on a Yuletide outing to take some photographs of the Cardiff Winterwonderland


A reminder to those in the group, we are meeting on the steps of Cardiff Museum at 7pm on Tuesday. If the weather is terrible, then we will abandon this, and go to the school instead. I will post on this blog at 6pm Tuesday with a live update as to whether or not we are still going. The students from the group have my mobile number, but those of you who missed class and wish to join us, can email me for my number. 


See you next week!  Ho ho ho!

Tuesday 22 November 2011

Digital Photography Class 8

Tonight's class was a continuation of the work we did last week, but taking it a little bit further.
We were using PaintShop Pro's Clone Brush and Scratch Remover to fix issues in pictures. 


Last week's images were scribbled on by me, and the purpose was to remove the scribbling using the Clone Brush. Its an effective way to get used to the way the tool works, afterall we're not likely to encounter anything this bad with our own images.  This week however the images I gave the class, were images were I wanted specific things removed from the photographs. There were nine pictures in total. The time permitted doesnt allow for all nine to be completed in class, but because these images are available online, they are available to be downloaded at home, should anyone want to carry on with them in their own time.


The pictures can be downloaded by clicking on this link.


The first few images were to remove various objects from the pictures. The first example was to  remove the clock tower from the Roath Park photo. Others included the removal of a Fisherman, a Lifeguard, a load of Swans, a tree and finally a burnt out car on the Knap beach!


The Burnt Car is shown below, and one of the important things to consider when fixing this picture, is the size of the pebbles. When you look at the photograph the pebbles in the foreground are naturally larger than those that are closer to the sea, so when we are using the clone brush, we need to pay particular attention to the 'lay of the land'.  This ensures that the finished picture looks correct, with right sized pebbles where they should be!


The Burnt Car on the Knap Beach - is a good picture to practice on.
Practice makes perfect, and the more you play about with this tool, the better you will become at this. To me, it is one of the most used tools in PaintShop Pro and is very powerful, and gives stunning results if used correctly.


Good bit of advice: Recognise your mistakes as soon as they happen. You will find it impossible to correct if you let the mistakes build up.  Simply click on the Undo button at the top of the screen, or choose Edit and Undo, or alternatively press CTRL and Z on the keyboard.


The remainder of images I had made for download, were images where I wanted the smallest amount of modernisation removed from the pictures. Such as satellite dishes, and that sort of thing. The next step was to make the pictures old fashioned looking, by tinting them with a sepia tone. A very nice touch, is to blur the picture as well. The reason being, is if were are to make people think that the picture is an authentic old fashioned photo, camera's of the day, would not have taken nice crisp and sharp photographs like those of today. So by applying the Blur or Blur More effect gives a very pleasing look to what appears to be an old photograph!


For specific notes on this, click this link. The notes refer to version 8, but should easily translate albeit maybe some slight variations to higher versions such as X3 and X4. They are in Adobe PDF format so you will need to ensure you have Acrobat Reader installed on your computer. If you don't, you can get it from here: http://get.adobe.com/reader/


Tuesday 15 November 2011

Digital Photography Class 7

Straight onto the the computers tonight! No rest for the wicked.


For class tonight, I had prepared a dozen photographs for the students to 'repair' using the various tools in Paintshop Pro X3.  I had uploaded the images to my webspace, and the first thing the students had to do, was download them from the Internet and save in their 'My Pictures' folder.  Doing this saves me a little time, in that I dont have to copy the files to individual computers, or get the school technician to put the files in the students folders, and it has the added benefit that if the students have Paintshop Pro at home, they can download the pictures on their own computers and carry on at home at their own pace.


As I mentioned, there were twelve images, and I mentioned to the group that they were not to worry about the amount of images that were their, and that I would much prefer to see 2 well done images at the end of the class, rather than 10 badly rushed ones.


Tonight's Exercise (in PDF format, so you'll need Adobe Reader to view it)


For those not in class today, you can download the Exercise sheet by clicking on the image above, and if you haven't got a copy of PaintShop Pro at home, you can download a trial version from the following website:


http://www.corel.com/corel/product/index.jsp?pid=prod4130078&cid=catalog3550067&segid=2500058


Click here for the sample files from class, and you can have a go yourself at home.


Click on the Video above to see some of the new options in Corel's new Version X4 of PaintShop Pro.


It is time limited to about 30 days, but it will tide you over till Santa can get you a copy, so get it on your Xmas lists! ;)


The Exercise Sheet contained various images, with perhaps scribblings on that needed to be removed, or some specific instruction to what needed doing. For example their was a photograph of a new Lotus Evora, and it had advertising written down the side of the car. The exercise was to remove the text off the car. Another was a snowy hillside, and the task was to remove the sledgers from the image, and so on.


With a few teething issues, which is only to be expected, the results from tonight's session were really good. The whole group did a very good job indeed - well done everyone!


For those that asked about additional pages for their Student Folders, you can find them by clicking on the link below.


Click here for Student Diary files, and click on the ones you need.


Finally, here are some pictures from the class tonight! Enjoy them.


Hard at work on the computer!
Great job of fixing the photograph of the Rose!

Huw and Colin discuss techniques to correct their images.
Busy editing images, absorbed in the tasks!
All in all, it seemed to be a very enjoyable class. Time certainly flied by, and from what I gathered, everyone seemed to enjoy themselves. More Photo Editing fun next week....be sure to check back to see what we get up to!


Friday 4 November 2011

Digital Photography Bonus: Fireworks


For those out and about this weekend, either hoping to take pictures at an organised Bonfire Night display, or perhaps your own Fireworks party in your back garden, taking some advice from the below website may well assist you in getting the best results in your photographs!


Enjoy, and be sure to Follow the Fireworks code!

Tuesday 1 November 2011

Digital Photography Class 5

Welcome back after the Half Term break!  Doesn't time fly? Class Five already!


Tonight's class started off quickly with a round up of the student folders, just so that I can cast my eye over them, and to make any comments. This keeps the people in charge happy, and also ensures that we have something to show the moderators of the centre should they wish to see examples of what the students do in the school.  So that's why it's important to keep your folders. Anyway, more about that in class next week.


The main focus of tonights session was our first look at Paint Shop Pro on the school computers. It was a demonstration of version thirteen of the software which it's full title is Corel PaintShop Photo Pro X3.


The main reason we tend to use Paint Shop Pro as opposed to the industry leader Adobe Photoshop (which quite a lot of people rave about) is that firstly, it's relatively inexpensive, and secondly it is so much easier to use that Adobe Photoshop and Photoshop Elements. I say this with experience of both products. I have to use Photoshop on my Mac computer at home as there isn't a version of Paintshop Pro available.  So for me, and those of you with Apple computers, you have no choice in the matter, it's Photoshop or nothing.

Anyway, from teaching photo-editing for several years now, if there is something most people want, is to be able to do things as simple as they possibly can. They are not interested in long-winded processes or ways to do things, and again having used both products, PaintShop Pro wins hands down....it is so much easier to use - fact!

To purchase this for your computer at home you can click on the link below, and it will take you to Amazon's website. You haven't got to go to Amazon, but it's simply a guideline to how much it costs, and at the end of the day, they are a reliable company to deal with.


There is a newer version X4 available, but you will find version X3 more than adequate, and much cheaper.  Those on a budget, or who tend to just look for the ultimate bargains, will find copies of Versions 9, 10, 11 and 12 elsewhere online for even better prices, such as on eBay for an example.


The notes I currently use are for version 8 of PaintShop Pro, and everything in them is directly compatible with the later versions. In due course I will replace them with newer updates, however you should not be concerned by this fact as everything in them is the same in version X3. So don't panic.


Click on the link below to download a set of my notes on PaintShop Pro. There are only 11 pages, so I would highly recommend you printing these out.


PaintShop Pro Notes - PDF format


There is nothing worse than reading page after page of text, people like to see pictures with simple instructions. Here are some examples of what the notes are like:


The above screen shows what each of the tools do, and how to access them. Tools that are in the same location no matter the version of PaintShop Pro you have.


The above example shows the page for Resizing pictures, with clear simple instructions on exactly what to do.

There are many books on the market for PaintShop Pro, but I tend to find that with these simple notes to get you going, and the other things you will pick in class, you shouldn't need to spend a fortune on literature, you'll become familiar with it very soon!

Next week, I will be setting some exercises, a letting everyone have a go on the computers!


Sunday 30 October 2011

Classes Resume

Just a reminder for those who were hoping to have more than one week off from class, we are back in this week, Tuesday 1st for Digital Photography, and Wednesday 2nd November for PC Maintenance.

Don't forget to bring your folders in on Tuesday, those of you in my camera class!

See you in the week

Chris

Wednesday 19 October 2011

Half Term Holiday

Remember its Half Term next week, so if you come to class you will find the building locked, and in darkness!  Night classes resume on Tuesday 1st November, and Wednesday 2nd November 2011.


Don't forget to bring in your 'student folders' - Digital Photography Class!


Have a good week off!


Tuesday 18 October 2011

Digital Photography Class 4

Tonight's class the students brought in some Autumn bits and pieces for us to take some still life photography. Autumn gives us great opportunity in terms of colour and a wide variety of colourful leaves.

Here is a selection of images from last nights class:


Arranging the different materials on the tables. Notice how some of the students are using tripods, this enables certain macro shots to be sharp and accurate.

Colin discovered that in his bag of Autumnal goodies, he had a little friend.

Colin's tiny stowaway! Leaving his mark on the table top as well. (We wiped it afterwards...and no harm became of the snail either!)

With everything that was brought in, there was a very good selection for the group to choose from.

Colin's Tomato and Holly arrangement, very festive - if not too early!
All in all a very good session. It's quite useful to be able to actually spend some time with the camera, actually taking photographs. Many of us lead busy lives and scarcely have the time to dedicate to it, unless we are going somewhere special perhaps. That's one of the things I like to provide in the class - time where the students can play about with their cameras, and ask questions and get advice when they need it.

It's Half Term next week, so remember - no school! When we return we will be looking at Paint Shop Pro X3, and learning how to modify our photographs! Should be fun!

Digital Photography Class - Homework Assignments.

Just a reminder in case you haven't done your homework assignments. They will not take you too long so don't panic!

Week Three: Standing Steady

This week's homework, which I will talk about tonight is:


and for those eager among you, I have posted the following:

Week Five: Label the Camera

There is no class next week as the school is shut for the Half Term break, however remember that your Autumn Project is due in when you return. Bring that in, in your student folders as well as the other homework sheets that I have given out, as I need to see them.

If you need additional copies of the Student Diary sheets (i.e. What we did tonight sheets) or you have lost the brief for the Autumn Project, you can get them by clicking the link below:


Enjoy the week off, and I'll see you after Half Term, or tonight, depending when you read this!

Tuesday 11 October 2011

Digital Photography Class 3

If you place every element of interest in a photograph on one side or another, or more commonly by the beginners in the center of the image, you are leaving little or nothing to look at on the opposite side. This will be a unbalanced and most likely an uninteresting image.

There are basically two types of balance in photography. The first is formal balance, also called symmetrical balance. As the name suggest it is when one or more identical or similar subjects are repeated symmetrical on each sides of a given point. The formal balance is most often recognised by subjects that are uniform in shape.


The second type of balance in photography – radial balance. This is when all the elements of the design “radiate” from a center point in a circular fashion. Radial balance is a great way to lead the eye into the focal point in the center of the ad.

Having looked at some of the 'Rules' of Photography. I set the class a task to take a series of photographs around the school based on Symmetrical Balance and Radial Balance.

After break, I demonstrated the functions of my camera to the class by plugging it into the class interactive board. I talked the class through the various 'scene modes' the camera had, and drew parallels to the kind of settings you would find on the majority of digital cameras. Digital cameras offer a variety of useful modes that are optimised for specific scenes and photographic conditions. Scene modes are preprogrammed by the manufacturer to automatically give the best exposure and settings for each scene.

When selected, a scene mode can often give better results than shooting in a standard full automatic mode. Some digital cameras have an Intelligent Mode that analyses the type of scene and shooting conditions you’re photographing and then automatically selects the scene mode.

Below is a image of the Scene Mode on a Panasonic Digital Camera:


Click the below link for further information:


Next week we will be having a practical session where I have asked the students to bring in some Autumnal foliage and bits and pieces, so that we can take some still life shots and compositions. Should be fun!


Digital Photography Resources

Click on the website below to access resources and materials we have used in class.
You may need to print yourself some of the Student Diary templates.


Please note that the files are in PDF format, and that you will need to have Adobe Reader installed on your computer. If you do not have this software then you can download it from http://www.adobe.com

Available from the link you will find the two presentations that I have shown in class, and the Student worksheets that I have given to date.

Simply right click each document, and select 'Save Target As'

Any problems, drop me an email at chrisjthomas@gmail.com or comment on this post.


Wednesday 5 October 2011

Digital Photography Class 2

Tonight's session started off with a detailed discussion about how we connect our cameras to the computers that we use. There are three main ways you can do this, and they are either using a USB cable that connects you camera physically to your computer, or removing your camera's memory card and inserting into a slot in a card reader that is built into, or attached to your computer. The last way to transfer your images from a camera is using Wi-fi - if your camera supports it. There aren't many out there, and from my experience, I have yet to meet someone with the functionality, but this feature makes use of the wireless network in your home and will transfer files wirelessly without the use of cables.
We then talked about how the photographs were stored on the computer, and whether or not anyone in the group used anything other than the standard Windows Explorer 'cut and paste' technique to get images off the camera onto the computer - the answer was no. We then discussed how each of us stored our pictures, ie. in subfolders and so forth.
The most important part of tonight's session was next topic we covered, and that was backing up our photographs. Yes having them printed out in an album is a form of backup, but in the event of a computer 'issue' it would be the only uneditable copy you would have. Suitable methods used these days begin with CDs and DVDs. Simply pasting your photographs or documents onto a blank optical disk and burning them. A better option these days, particularly with the amount of space taken up by photographs, is the use of a USB external Hard disk Drive. These are approximately in the region of £50 and is by far the best solution these days for most people. We also discussed the use of a small NAS drive (Network Attached Storage), and how such a device could plug simply into any home network, or router and serve as shared storage for more than one computer that you may have - probably a bit excessive for the average computer user though. Nevertheless a very good backup solution, one of which I use myself.
Seagate FreeAgent GO – Portable HDD in Docking Station.
After break the second half of the class was all about taking good photographs. I gave the class a presentation on Photographic Composition and the Six Rules of Photography. These included a good look at the following:
  • Simplicity
  • Symmetrical Balance
  • Asymmetrical Balance
  • Radial Balance
  • Rule of Thirds
  • Framing
We finished the session by having a look at the Kodak Top Ten Tips for taking great pictures, and it is a very useful set of tips and good advice for any photographer!
More next week.....check back for more info!


Tuesday 27 September 2011

Digital Photography Class 1

First class of the new academic year - its been a while! Summer, what little we had is an after thought now, and the dark nights are drawing in on us, pretty fast.

Nevertheless we have our new round of classes to look forward to, and tonight's new group seem very enthusiastic. As with all of my new classes, tonight's session was the standard introduction type of class, where I started off by introducing myself, and telling the group a little bit about myself, and then assisted with a PowerPoint presentation I then got the group to introduce themselves, asking them to tell me about their computer and camera experience.

The main difference with this course compared to previous years, is that this year the course is accredited. This means the students will come away with a proper education qualification and a nice certificate. Full details on the accreditation process and the organisation can be found at

After the introductory session, we continued the presentation which guided the students through the agenda for the next ten weeks. Then we moved on to the evenings topic, which was the basic functions of a digital camera. Examining the basic functions such as Flash, Macro, Timer and White Balance.

Flash mode is vital to know how and when to use, and most cameras these days have settings for Automatic, where the computer in the camera determines when the use is required, No Flash, where the Flash is disabled, and Always on, where for every picture you take, the flash will be fired. The final option that most cameras have is Red Eye Reduction. For a full account on exactly what "Red Eye" go to this address:

Macro Mode. A setting on a digital camera that enables users to focus on subjects close to the camera lens. Macro mode is commonly used to photographing flowers, insects and other small items that you want a close-up view of. The distance you can shoot in macro mode from will differ between cameras. Some may be able to focus when the lens is less than an inch away from the subject, while others may be an inch or further.

Timer function on the camera, basically allows you to stabalise the camera on a tripod, and then run in front of the camera and join a group photo. There are usually two lengths of time you have to choose from. My camera, a Canon SX30is has 10 seconds and 2 seconds. Obviously depending on what you are photographing, and how fast you can run, determines which you need. However 2 second mode is ideal for macro work using a tripod where no camera shake it required, even from pressing the shutter button.

The last setting we looked at was White Balance. White balance (WB) is the process of removing unrealistic color casts, so that objects which appear white in person are rendered white in your photo. Proper camera white balance has to take into account the "colour temperature" of a light source, which refers to the relative warmth or coolness of white light. Our eyes are very good at judging what is white under different light sources, but digital cameras often have great difficulty with auto white balance (AWB) — and can create unsightly blue, orange, or even green colour casts. Understanding digital white balance can help you avoid these color casts, thereby improving your photos under a wider range of lighting conditions. On most camera you can alter this on a sliding scale from +2 to -2.

Join us next week for more fun!

Tuesday 26 July 2011

Schools Out for Summer!

It is with regret that the camera class did not continue into the summer term this year, due to dwindling numbers, and I guess with the lack of enthusiasm, my entries in this blog paid the price too, as it appears the last entry I made was just before Easter at the end of the Spring Term. We did however soldier on with just the PC Maintenance Class, and all that attended enjoyed the sessions. Time escaped me – ran away, and the summer term disapeared so fast that I cannot believe it is August next week.

For those wanting to come back and do a class in September at Barry Comprehensive School on Port Road, I would strongly urge you to sign up as soon as possible and get your names down, especially for the Digital Camera Class, as I know there are a few names down for that already.   Places will be allocated to those that sign up first.

Click this link to find out how to enroll!

The classes that I will be teaching this coming academic year 2011/12 :

  • Mondays – Ebay Online Auctions

Starting 26th September for 10 weeks.  (This is a one off course)

  • Tuesdays – Digital Photography Class

(10 week sessions – Starting 27th September 2011 continues on into 2012)

  • Wednesdays – PC Maintenance

(30 weeks split into 10 week terms starting 28th September 2011 )

  • Desktop Publishing with Microsoft Publisher and CorelDRAW!

Starting 9 January 2012 – This is a one off course.


However fingers crossed for the new term starting the last week of September 2011, and for the time being…..enjoy the summer holidays, let’s hope we get some warm weather!


See you in September


Chris

Saturday 26 March 2011

Summer Term: Dates and Times

It’s over so soon, where does the time go, the Spring Term is done and dusted.  Students get two weeks break now, and we start the Summer term, two weeks before Easter, as that break is late this year because of the date that Easter happens to fall this year.

The dates and times are as follows:

Digital Photography:  Starts – Tuesday 12th April for two weeks. Then two weeks off returning on Tuesday 11th May, for 4 weeks, then it’s the Whitsun half-term break, and we return on Tuesday 25th May for the final 4 weeks, that make up the 10 weeks!

PC Maintenance:  Starts – Wednesday 13th April for two weeks. Then two weeks off returning on Wednesday 12th May, for 4 weeks, then it’s the Whitsun half-term break, and we return on Wednesday 26th May for the final 4 weeks, that make up the 10 weeks!

See you then….it should be good!

Fotolia_3383852_XS

Wednesday 23 March 2011

PC Maintenance Class 10: Term 2

Tonights session was based on the command line , or command prompt. Before Windows was on our computers, the MS-DOS environment was all we had. Our computers and the commands and fuctions it uses were what we class today as ‘command driven’.

MS-DOS (short for Micro Soft Disk Operating System) is an operating system for x86-based personal computers. It was the most commonly used member of the DOS family of operating systems, and was the main operating system for IBM PC compatible personal computers during the 1980s to the mid 1990s, until it was gradually superseded by operating systems offering a graphical user interface (GUI), in particular by various generations of the Microsoft Windows operating system.

MS-DOS grew from a 1981 request by IBM for an operating system for its IBM PC range of personal computers. Microsoft quickly bought the rights to QDOS (Quick and Dirty Operating System), also known as86-DOS, from Seattle Computer Products, and began work on modifying it to meet IBM's specification. The first edition, MS-DOS 1.0, was launched in 1982. The version shipped with IBM's PCs was called PC DOS. Although MS-DOS and PC-DOS were initially developed in parallel by Microsoft and IBM, the two products eventually went their separate ways.

During its life, several competing products were released for the x86 platform, and MS-DOS itself would go through eight versions, until development ceased in 2000. Ultimately it was the key product in Microsoft's growth from a programming languages  company to a diverse software development firm, providing the company with essential revenue and marketing resources. It was also the underlying basic operating system on which early versions of Windows ran as a GUI.


Here is a typical screen shot of a computer running MS-DOS.  Not much to look at really:

The above screen shot shows MS-DOS version 3.3 and it is a directory listing of a floppy disk in the computers drive A:

I introduced the class to the concept of using “wildcards” in MS-DOS, and how they can still be used today in the search functions and capabilities of Windows XP,  Vista and 7.

Wildcards are characters that can be used to stand-in for unknown
characters in file names. In card games, a wildcard is a card that can match
up with any other cards. In DOS, wildcard characters can match up with any character
that is allowable in a file name.

The asterisk character, *, can stand in for any number of characters.
Some examples of this command:

c:\>del *.doc

This command would delete every file with the doc extension
from the root directory of C: . So files like myfile.doc, testfile.doc, and
123.doc would all be deleted.

C:\>copy ab*.txt a:

This command would copy every file that began with ab,
and had an extension of txt, to the floppy drive A: . So files like abstract.txt,
abalone.txt, and abba.txt would all be copied.

C:\temp\>del *.*

This is the fastest way to clean out a directory. This command
will delete every file in the directory C:\temp\. The first apostrophe covers
every filename, and the second one covers every extension.

For some substantial information on using Wildcards in Windows search, click this link.

Tuesday 22 March 2011

Digital Camera Class 10: Term 2

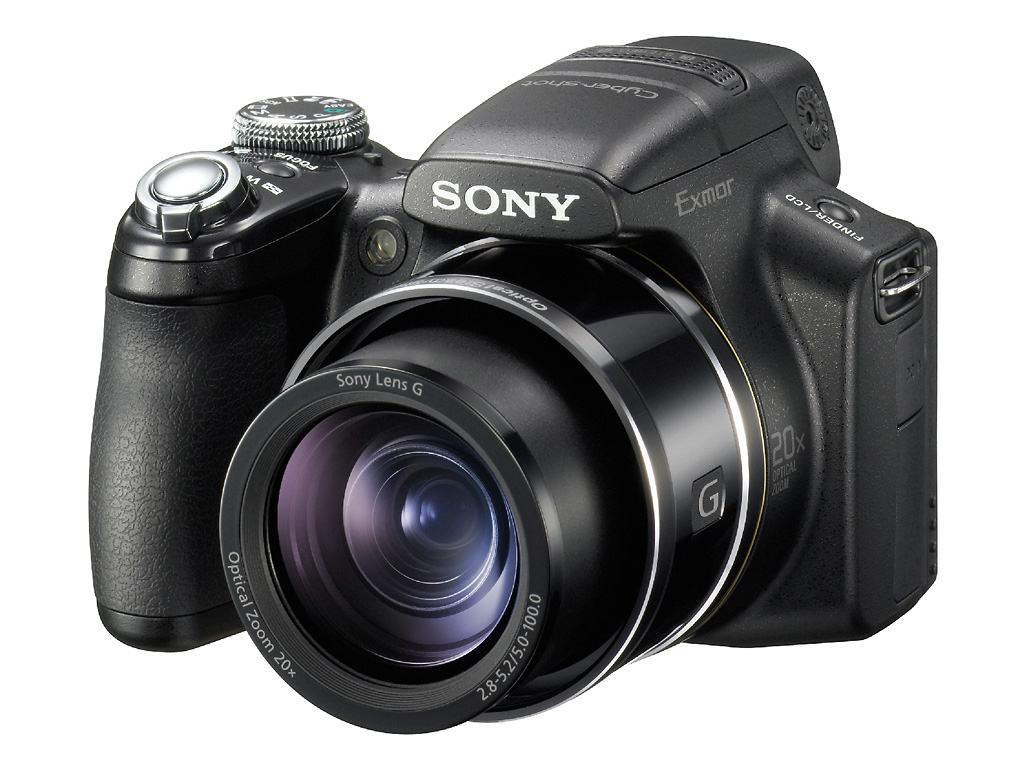
Can you believe it? The Spring term has come and gone….this is our last class!  Just a small group tonight, only Colin and Dick. We used to time to research and look into specialist things for them, such as 1.7 telephoto convertor for Dicks’ Sony DCS HX1 camera, and he had also brought in his adapter and convertor kit for us to see.

The converter kit will allow him to connect a variety of filters and the petal filter hood.

Here is a photograph of his camera, a later version of the previous camera I had myself.

A two week break now, we’ll be back soon for the summer term – see you then!

Wednesday 16 March 2011

PC Maintenance Class 9: Term 2

We spent a lot of time looking at harddisk, and discussing partitions, stripe setting, and disk mirroring last time. This week, using my faithful demo computer, we had a look at how Windows these days deals with disks.

This is done using the Computer Management tool ‘Disk Management’.

Disk Management is a snap-in that's part of the Microsoft Management Console supplied with Windows XP.  Just as the name Disk Management implies it's a tool used to manage system disks, both local and remote. If you've been around personal computers for a number of years you're familiar with Fdisk, the utility that was used in conjunction with the Format command to set up hard disks from the command prompt. Disk Management, with its graphical user interface, goes a long way to eliminating the need for the command prompt utilities and makes it easy to obtain a quick overview of the system and the relationships between installed disks.

There are a few different ways to access Disk Management. I'll list three different methods so choose whichever is more convenient.

  • Method 1  -  Start > Control Panel > Performance and Maintenance > Administrative Tools. Double click Computer Management and then click Disk Management in the left hand column.
  • Method 2 - By default, Administrative Tools is not shown on the Start Menu but if you have modified  the Start Menu (by right clicking the Start button and selecting Properties > Customize) so it is shown then just select Start > Administrative Tools >  Computer Management and then click Disk Management in the left hand column.
  • Method 3 - Click Start > Run and type diskmgmt.msc in the Open: line and click OK. The Disk Management snap-in will open.

Three Basic Areas of Disk Management

The basic Disk Management console is divided into three main areas and just about as straightforward as one can get. In the screen shot below the areas are defined by green, red, and blue rectangles. The Console Tree is the tall vertical column on the left that's defined by the green colour. If Method 3 above is used to open Disk Management it will open without the Console Tree being displayed. I suggest you get rid of the Console Tree as it really serves no purpose once Disk Management is open. Even if you used one of the other methods, the Console Tree can be eliminated by clicking the Show/Hide Console Tree icon (fourth from left) on the standard toolbar.

The red and blue areas are referred to as Top and Bottom and are both user definable via the View menu option. By default, the Top area displays the Volume List and the Bottom area displays the Graphical View. A third view called Disk List can be substituted in either pane if it's more to your liking, or the Bottom pane can be hidden completely. The View menu option also contains a [Settings...] option that allows adjustment of the colour schemes, size of the drive displays and a few other options so the console can be tailored to individual taste.

Tuesday 15 March 2011

Digital Camera Class 9: Term 2

Adobe Photoshop is a graphics editing program developed and published by Adobe Systems Incorporated.

Adobe's 2003 "Creative Suite" rebranding led to Adobe Photoshop 8's renaming to Adobe Photoshop CS. Thus, Adobe Photoshop CS5 is the 12th major release of Adobe Photoshop. The CS rebranding also resulted in Adobe offering numerous software packages containing multiple Adobe programs for a reduced price. Adobe Photoshop is released in two editions: Adobe Photoshop, and Adobe Photoshop Extended, with the Extended having extra features available. Adobe Photoshop Extended is included in all of Adobe's Creative Suite offerings except Design Standard, which includes the Adobe Photoshop edition.

Tonight the group looked at whether or not it was indeed better than Corel’s Paint Shop Pro. The results in, the group said no…Paint Shop Pro was a much easier to use program, and did exactly the same in a fraction of the time.

image20080212psamla_2

Wednesday 9 March 2011

PC Maintenance Class 8: Term 2

Harddisks, Partitioning, Volumes and Stripe Sets this was tonight’s agenda. Last week we saw how a machine was restored from what was a haddisk partion, but how does a harddisk work, and precisely what is partioning and other things we can do with harddisks.

Below is a diagram of the inside of a harddisk. It isnt recommended you remove the cover from your working harddisks, they are vaccuum sealed, however to get an understanding of the mechanics of one, it might be interesting for you to take apart one from an old computer.

I actually powered up the dismantled drive so that the class could see how it worked. I often refered to how it worked, by drawing parallels to those of a record player, with a stylus and a 12” vinyl record.

We then talked about Disk Formatting and Partitioning. What is Formatting?

Formatting a hard drive is generally done when a new hard drive has been purchased and installed in a new computer. Formatting a hard drive enables it to be able to read and write data by creating a partition on the drive. A hard disk drive can be formatted or reformatted depending on what is being done to the drive

When a new hard drive is formatted a bootable partition is created. The partition that is created is where that operating system is installed. Once a drive has been formatted it can then be used as a Master disk or a Slave disk. A second partition can also be created on the hard drive that can be used as a virtual hard drive.

Formatting a hard drive requires selecting a file system that will be used on the drive. The file system is what the operating system uses to organize and locate information that is written to various sectors on the hard disk. A hard drive with an older files system may not work on a computer designed for a newer file system.

Formatting a hard disk drive will overwrite the data on the drive. However, the data hasn't exactly been erased. The formatting process only removes the operating system's ability to read the data on the drive. Data needs to be rewritten to the drive and then reformatted again to ensure that data is no longer accessible.

Formatting a hard disk drive can fix bad sectors or areas on the disk. When a disk that has errors is reformatted the bad areas of the disk are skipped and not used. This can extend the life of a hard disk drive that can be going bad by isolating the bad areas of the drive.

Useful resources:-

Formatting Disks - Frequently Asked Questions

How to Create and Format a Hard Disk Partition

How to Delete a Hard Disk Partition

Can I repartition my Hard Disk?

We ended the session by discussing what Disk Mirroring,  Striping or Extending Volumes and what RAID arrays were.  Disk Mirroring is where  you have two hard disks fitted into a computer, and when you save data, it is written to both disks. By continuously writing to two sets of disks, you ensure immediate access to duplicate data with virtually no data loss. If one hard drive fails, then the data can be retrieved from the second hard drive.

Disk Striping, in its simplest form is a collection of disks that together, through striping, makes up one unit. So you could have three hard disks in a computer, the first being partitioned as C: and D:, but the D: drive can be extended onto the second and third disks. If each disk were 1 terabyte, you end up with a computer system that has a 500GB C: drive, and a 2.5 TB D: drive.

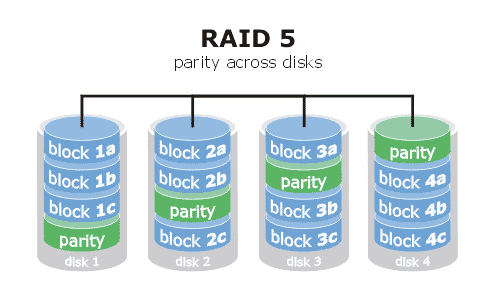
RAID, an acronym for Redundant Array of Inexpensive Disks or Redundant Array of Independent Disks, is a technology that allows high levels of storage reliability from low-cost and less reliable PC-class disk-drive components, via the technique of arranging the devices into arrays for redundancy. In simpler terms, a RAID array is a grouping of hard drives. A NAS drive for example might have 4 disks in it, but configured in what is known as RAID5 format. The data is written to two drives at a time, allowing at any point one hard disk to physically fail, and the unit to carry on functioning. RAID5 is the most popular, but there are many different configurations.

RAID Level 5 is a cluster-level implementation of data striping with DISTRIBUTED parity for enhanced performance. Clusters can vary in size and are user-definable but they are typically blocks of 64 thousand bytes. The clusters and parity are evenly distributed across multiple hard drives and this provides better performance than using a single drive for parity. Out of an array with “N” number of drives, the total capacity is equal to the sum of “N-1? hard drives. For example, an array with 4 equal sized hard drives will have the combined capacity of 3 hard drives. This is the most common implementation of data striping with parity. In this example 25% of the storage purchased is used for duplication.
RAID is a good bedtime reading matter, and for further reading at this level here is a good starting point!